
How to create a Minecraft server with the Raspberry Pi
Following the arrival of the Raspberry pi 3, with its batch of technical innovations, we can go even further and create projects that require quite a lot of resources at the level of the processor, like creating a Minecraft server on the Raspberry Pi.
As a reminder, the Raspberry pi 3 now has a processor ARMv8 of 64bits, 4 cores, clocked at 1.2GHz, as well as a RAM boosted to 1Go! This new Raspberry Pi opens the door to a multitude of projects that can not be envisaged until today.
So here we will offer you a tutorial on how to install a Minecraft server on the Raspberry Pi 3.
The hardware needed to create a Minecraft server with Raspberry Pi
Before we look at Minecraft, let’s start with a quick tour of the hardware you’ll need to create a Minecraft server with the Raspberry Pi.
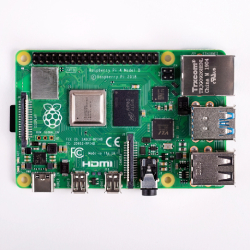
In the first place, you will of course need a Raspberry Pi, but many models exist. We advise you to choose a Raspberry Pi 3 (you can buy it online, here at Amazon), this one being more powerful and offering a 4 cores CPU, clocked at 1,2Ghz and 1 GB of RAM, which will be very useful for the performance of your server.
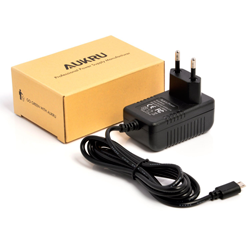
Moreover, you will also need a good quality powersupply for your Raspberry Pi. On our side we usually use this one, also found here on Amazon.
Finally, you will also need a good MicroSD card. Do not take first-rate cards with questionable performance. The quality of your card will greatly affect the performance of your Minecraft server.
We advise you to look at the side of SanDisk Ultra cards and take a card of at least 32GB, like this one, again easily found here on Amazon.
To take control of your Raspberry Pi, you will need to go through SSH (see our tutorial on Remote Control of the Raspberry Pi with SSH), or use a keyboard (for us, we are using that keyboard found on Amazon) and a screen (ideally HDMI, this is the most convenient).
What is Minecraft?
Okay, if you’re here it’s almost certain that you already know everything about Minecraft, but just in case.
Minecraft is a game released officially in 2011 and is fruit of the intensive work of the developer Notch and is today developed by the company Mojang. Minecraft is a reference in the « Sandbox » game world.
Minecraft has had an absolutely huge success, making it one of the most popular games in the world today!
A Minecraft server on the Raspberry Pi, why do?
Minecraft offers a multiplayer mode, where multiple users connect to a central server. It is this central Minecraft server that we propose to install here on your Raspberry Pi.
There are paid solutions to have its own server, nevertheless, these are very quickly limited by the number of players connected simultaneously or by the administration of the server.
With the power of the Raspberry Pi 3, we can now actually mount our own Minecraft server.
Indeed, if it were already possible to install a Minecraft server on the old Raspberry Pi, they were quickly submerged, for lack of computing power, a problem now settled with the Raspberry Pi 3.
How to Install the Minecraft server on the Raspberry Pi 3.
The installation of a Minecraft server on the Raspberry Pi 3 is relatively simple.
First of all, we will update our Raspberry Pi 3, an operation that should always be carried out before any installation. To do this, simply use the following command:
sudo apt-get update -y
sudo apt-get upgrade -y
Install Java on your Raspberry Pi
On the latest version of Raspbian, Java is now pre-installed!
If you are using an older version, you can install the latest version with the following command:
sudo apt-get install openjdk-8-jdk git
Java is now installed on your Raspberry Pi.
Install the Minecraft Server on the Raspberry Pi
In order to keep a Raspbian system clean and well organized, we will create a folder specifically for the Minecraft server.
We will create this folder with the following command:
sudo mkdir /home/minecraft
This done, we will go into the folder with the following command:
cd /home/minecraft
Now that we are in the right folder, we will download BuildTools.jar, a tool that will allow us to install a more optimized version of the Minecraft server, which will allow us to run it on the Raspberry Pi. We will use the tool wget, which allows to download a file:
sudo wget https://hub.spigotmc.org/jenkins/job/BuildTools/lastSuccessfulBuild/artifact/target/BuildTools.jar
All you have to do is to use the downloaded tool to install the latest version of the Minecraft server (if you want an older version, simply change the value of the -rev argument):
sudo java -jar BuildTools.jar –rev latest
The installation takes quite a long time (it takes us between 15 and 20 minutes), so you have time to go drink a coffee and read another article!
Run the Minecraft server
Our Minecraft server is now installed on the Raspberry Pi and we will now have to launch it and accept the terms of use.
To do this, simply run the following command:
sudo java -Xms512M -Xmx1008M -jar /home/minecraft/spigot-x.x.jar nogui
The parameter -Xms defines the minimum RAM allocated to Minecraft, here 512MB, -Xmx defined the maximum RAM, here 1000MB, finally the parameter nogui indicates to start the server without GUI. The other parameters simply tell Java to launch the Minecraft server.
(Note that you must replace the x.x of spigot-x.x.jar with the appropriate version number).
Accept the Minecraft Terms of Use
During this first launch, the server should return an error of this type: « You need to agree to the EULA in order to run the server. Go to eula.txt for more info. »
For that we will have to modify the file /home/minecraft/eula.txt and replace the line eula = false with eula = true. We will do it in a single command with the sed tool, here is the command:
sudo sed -i 's/false/true/g' /home/minecraft/eula.txt
Now that you have accepted the terms of use, you can restart the server, as seen previously.
Given that we are launching it for the first time on the Raspberry Pi, this will take a little time, the server must indeed create the necessary files and generate the card of the game, the next runs will be faster.
You should now be able to join the Minecraft server using the IP address of your Raspberry Pi!
Automatically start the Minecraft server when the Raspberry Pi starts
It may be very useful for the Minecraft server to start automatically when the Raspberry Pi starts, especially if you have a power outage or other event that causes your Raspberry Pi to restart.
At first, we will create a file run-minecraft.sh in the folder /home/minecraft, which will start the server when it is run, to create it you can use the editor of your choice , For example Nano, the command will be sudo nano run-minecraft.sh.
The file must contain the following lines:
#!/bin/sh
 cd /home/minecraft
 /usr/bin/java -Xms512M -Xmx1008M -jar ./spigot-x.x.jar nogui
(Again, you must replace the x.x of spigot-x.x.jar with the appropriate version number).
We will now add run-time rights to the file for all users:
sudo chmod +x /home/minecraft/run-minecraft.sh
Finally, we will launch this file at the start of the Raspberry Pi, so that the Minecraft server starts automatically. To do this, you must modify the file /etc/rc.local and add the line /home/minecraft/run-minecraft.sh just before the line exit 0.
Here, your Minecraft server will start at the same time as your Raspberry Pi!
Make the Minecraft server accessible via the internet
We now have a Minecraft server on our Raspberry Pi. It’s nice, but if we can not access the server from the outside, this is not very useful.
We will therefore have to allow access to the Raspberry Pi by internet. To do this, we redirect you to our article about how to put your Raspberry Pi webserver online with DynDNS and port forwarding, section « Redirect requests to the Apache server on Raspbian ».
In this article we talk about apache for Raspbian, but the technique for Minecraft is the same. The only difference is that instead of port 80 you must open TCP port 25565, which is the default port of Minecraft.
Conclusion
Now, you know how to install a Minecraft server on our Raspberry Pi 3.
Such a server should allow to manage between 8 and 10 people simultaneously, depending if your Internet connection offers you a sufficient rate.
This is obviously not a powerful server, but it should be large enough for personal use.
You now have all the cubes in your hands to manage your Minecraft server on your Raspberry Pi, do not hesitate to take a look at our other tutorials, such as installing a web server, or go for a ride on the accessories.
We hope you will have a great time!


everything goes well untill the command line with « spigot-x.x » spigot just does not exist…
Are you sure you are in the good directory.
With raspbian stretch you need to also install git:
sudo apt-get install git
Before running the BuildTools