Remote control your Raspberry Pi from your PC with VNC!
If you use Raspberry Pi regulargly, you may have already needed to use the graphical interface of the Raspberry Pi without having monitor available. It is a classic problem, and always annoying.
Today we will see how to use VNC to control your Raspberry Pi from another computer, so you can use your Raspberry Pi without screen!
Materials needed to set up VNC
For this tutorial, we will need only a very minimal installation:
- A Raspberry Pi 3 under Raspbian, functional and up to date
- A computer from which to take control
What is VNC?
VNC, or Virtual Network Computing, is a system allowing remote control of one computer by another. When using VNC, two different parts of the software are used.
The first part is the VNC server. This one is installed on the machine we want to take control of (here the Raspberry Pi), and it will allow the connection and the control by the client part.
The second part is therefore the VNC client. It is installed on the machine from which you wish to control the server and it will allow to translate your actions into operations comprehensible by the server which will then control the remote machine from your computer.
The main interest of VNC is that it allows to take control of a remote machine, while displaying the desktop of it. So you can see in real time what is happening on your Raspberry Pi, without having to plug it into a screen!
Enable the VNC server on your Raspberry Pi
In order to connect to your Raspberry Pi with VNC, we will first have to activate it.
The first step will therefore be to connect to the Raspberry Pi in SSH, if you do not know how to, follow our tutorial to learn how to connect in SSH to the Raspberry Pi.
Once you connect SSH to Raspberry Pi, we will be able to activate the VNC server which is installed by default on Raspbian (on previous versions, it was necessary to install itself real-vnc).
For that, nothing very complicated, you just need to run the command sudo raspi-config, select the line Interfacing Options, then line VNC, and finally answer that you want to enable VNC.
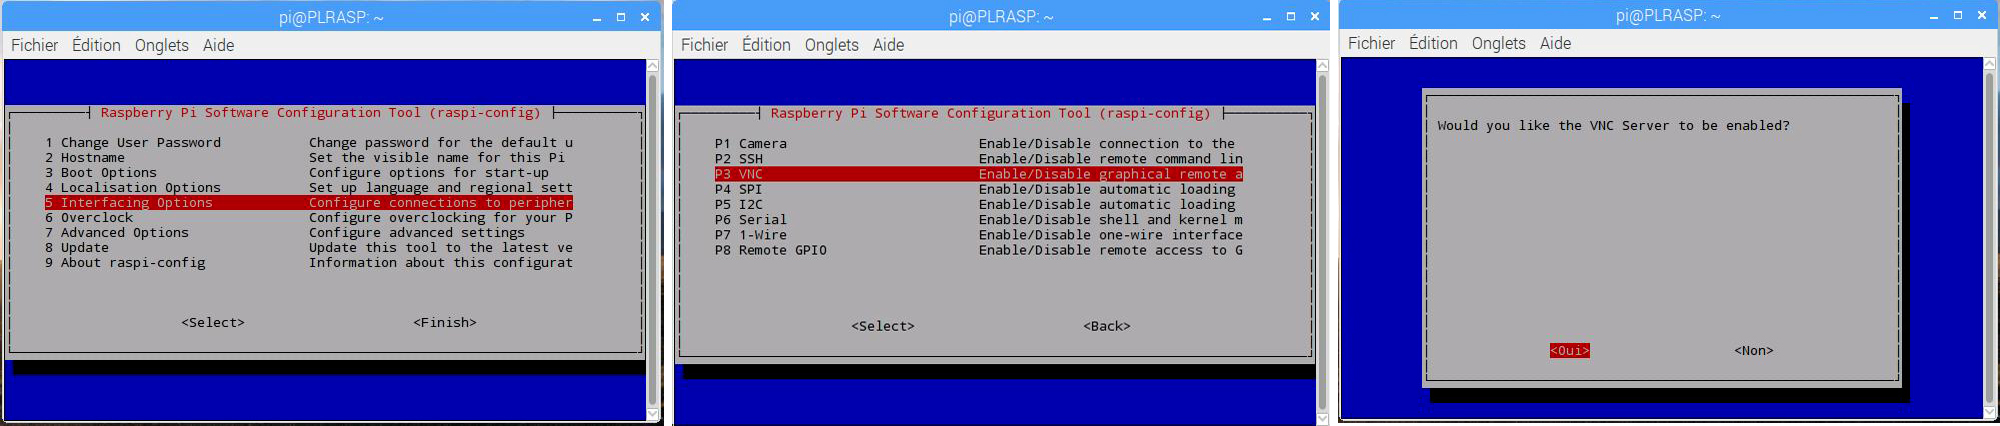
Choose « Interfacing Options », then « VNC », and then confirm the activation.
Connect to VNC to control Raspberry Pi
Now that we have activated the VNC server of the Raspberry Pi, we just have to connect to it. For this we will have to install a client on the computer from which we want to take control of the Raspberry Pi.
By default, Raspberry Pi uses the RealVNC server, which is configured to use a login mode based on user accounts on the machine. The only problem is that this connection method is not supported by all VNC clients. We will have to install a compatible client, the RealVNC client.
To install the RealVNC client on your computer, nothing complicated. Simply go to the official download page of RealVNC Viewer, download and install the version corresponding to your operating system (Linux, Mac or Windows).
Once you have installed RealVNC viewer, you only have to launch it and connect to the IP address of the Raspberry Pi, the default identifiers are those of the account pi.

Log in using the account pi and his password.
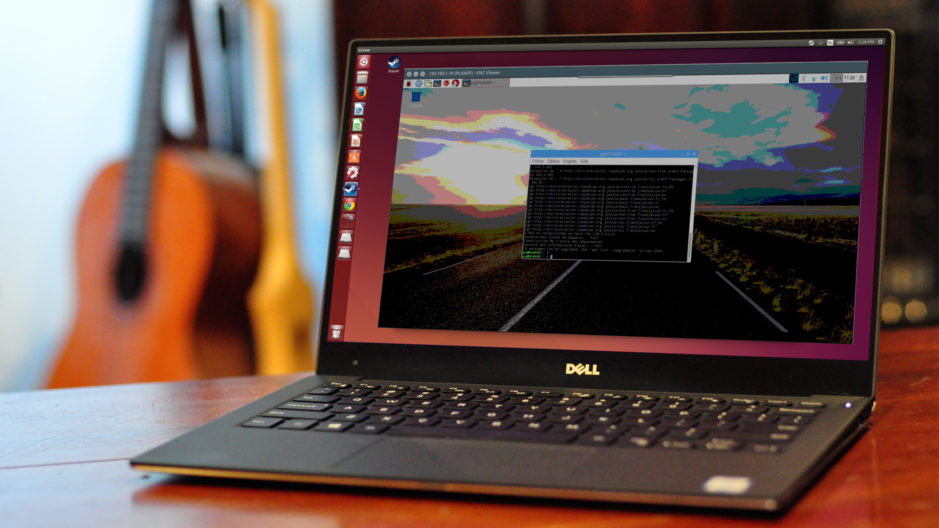
You are now connected to the Raspberry Pi, and you can control it, with its interface, from your computer!

As you can see, we remotely control the Raspberry Pi from our laptop!
Once you have established the connection to an IP address, RealVNC viewer will remember this connection, and by right-clicking this connection, you will be able to configure various options, such as the quality of the image, its fluidity, etc. .
You now know how to control your Raspberry Pi with VNC, and you just have to take advantage of it to test hacks without having to bother with the monitor.
Do not hesitate to consult our other tutorials, like our buying guide for Raspberry Pi.


My Raspberry Pi 3 model B is running Raspian Linux, Buster version. I know the GUI works because I have connected a 7-inch HDMI monitor to it with mouse and keyboard. I want to run all my Raspberry Pi’s headless except for a Raspberry Pi 4 4GiB to be run as desktop and the primary computer to SSH into the other Pi’s. I can’t get the first Pi to connect using Real VNC Server on the Pi and Real VNC Viewer on the Linux Mint laptop. I need help to figure this out.
My Raspberry Pi VNC Server will not permit to connect to it. I use the IP 192.168.1.101 and a GUI appears saying « Cannot currently connect to desktop ». I try the full IP 192.168.1.101:1 and VNC Viewer opens a window with a red circle containing a white X saying « The connection was refused by the computer ».
Through xTerminal on a Linux Mint, client, computer I SSH (ssh pi@192.168.1.101) and log in without problem. I am able to do CLI with no problems. I ran raspi-config and set the VNC to be turned on.
I have un-installed Real VNC Server from the Raspberry Pi 3 model B and the Real VNC Viewer twice and re-installed on both computers and continuously receive the same messages. I have also tried issuing this command « sudo systemctl start vncserver-x11-serviced.service » to the SSH session from my laptop to the Pi, but still receive the same messages not permitting access to the VNC Server GUI Desktop on the Pi.
Well thats seems like a pretty complicated problem, i would suggest you to ask for help on the raspberry pi forum wich seems more adapted to discuss efficiently.